

How To Change Rear Shocks On 2012 Nissan Altima
REAR Pause ASSEMBL
Exploded View
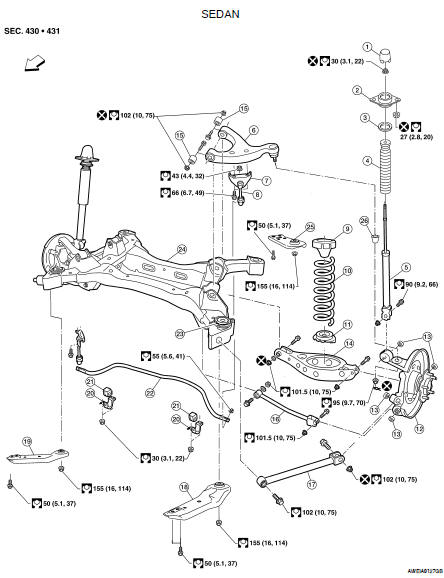
1. Cap
two. Daze absorber insulator
3. Shock absorber seal
4. Bound bumper
5. Daze absorber
6. Pause arm
7. Connecting rod mountain subclass
8. Connecting rod
9. Upper rubber seat
10. Coil spring
11. Lower condom seat
12. Knuckle
thirteen. Knuckle bushing
14. Rear lower link
xv. Intermission arm bushing
16. Front lower link
17. Radius arm
eighteen. Front member stay (LH)
19. Front member stay (RH)
20. Stabilizer bar clench
21. Bushing
22. Stabilizer bar
23. Member stopper
24. Rear suspension member
25. Rear member stay
26. Ball seat

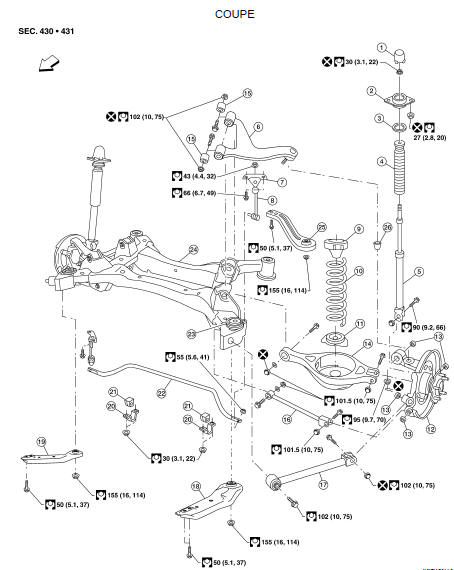
1. Cap
2. Shock absorber insulator
iii. Shock cushion seal
four. Leap bumper
five. Shock absorber
6. Suspension arm
7. Connecting rod mount bracket
eight. Connecting rod
9. Upper rubber seat
x. Coil jump
eleven. Lower rubber seat
12. Knuckle
13. Knuckle bushing
xiv. Rear lower link
15. Break arm bushing
16. Front lower link
17. Radius arm
xviii. Front fellow member stay (LH)
19. Front fellow member stay (RH)
20. Stabilizer bar clench
21. Bushing
22. Stabilizer bar
23. Member stopper
24. Rear suspension member
25. Rear fellow member stay
26. Ball seat

Removal and Installation
Removal
Caution: Earlier removing the rear pause assembly, disconnect the ABS wheel sensor from the assembly.
Failure to practise so may effect in harm to the sensor wires and the sensor becoming inoperative.
1. Remove the center exhaust tube with muffler(due south). Refer to EX-6, "Removal and Installation" (QR25DE) or EX-12, "Removal and Installation" (VQ35DE).
two. Remove restriction caliper assembly and reposition aside, without disconnecting the hydraulic hose, using power tools. Refer to BR-35, "Brake CALIPER Assembly : Exploded View".
• Leave the restriction hydraulic hose connected to the brake caliper.
• Practice not depress the brake pedal, or the caliper piston will popular out.
• Do non pull or twist the brake hydraulic hose.
3. Remove brake rotor. Refer to BR-35, "Restriction CALIPER Assembly : Exploded View".
iv. Disconnect parking brake cable from knuckle. Refer to Atomic number 82-6, "PEDAL Type : Exploded View" (pedal type), Atomic number 82-seven, "LEVER TYPE : Exploded View" (lever type).
5. Remove rear wheel sensors. Refer to BRC-63, "Removal and Installation" (ABS), BRC-134, "Removal and Installation" (TCS/ABS), BRC-236, "Removal and Installation" (VDC/TCS/ABS).
6. Remove lower shock absorber nuts using power tools.
vii. Remove lower control arm link adjusting commodities and arm. Refer to RSU-13, "Removal and Installation".
8. Remove upper ball joint nut and cotter pivot. Refer to RSU-10, "Exploded View".
9. Disconnect radius rod member side. Refer to RSU-xv, "Removal and Installation".
10. Disconnect lower link adjusting commodities. Refer to RSU-14, "Removal and Installation".
11. Remove knuckle. Refer to RSU-x, "Exploded View".
12. Remove stabilizer bar. Refer to RSU-16, "Removal and Installation".
13. Disconnect lower link adjusting bolt. Refer to RSU-xiv, "Removal and Installation".
14. Disconnect member harness.
15. Support the rear suspension assembly using a suitable jack.
16. Remove the suspension fellow member nuts and member stay bolts using ability tools.
17. Lower the rear suspension assembly.
Installation
Installation is in the reverse order of removal.
• Check the rear wheel alignment and conform if necessary. Refer to RSU-18, "Rear Wheel Alignment (Unladen*)".
 On-vehicle maintenance
REAR SUSPENSION ASSEMBLY On-vehicle Service • Check the break parts for excessive play, cracks, wear or damage. Shake each rear bike to cheque for excessive play. • Retighten all nuts ...
Other materials:
Ground
Basis Distribution Principal HARNESS ENGINE ROOM HARNESS FRONT Terminate MODULE HARNESS ENGINE CONTROL HARNESS Trunk HARNESS BODY NO. 2 HARNESS HARNESS Harness Layout HOW TO READ HARNESS LAYOUT The following Harness Layouts utilise a map style grid to assist locate connectors on the draw ...
Nissan vehicle immobilizer systemnats symptoms
Symptom Table Security indicator does not turn ON or wink. CAUTION: • Follow Problem Diagnosis Flowchart referring to "SEC-10, "Work Flow"". Determine malfunctioning condition before performing this diagnosis. • Check that vehicle is nether the condition shown in "Condit ...
Satellite radio tuner
Diagnosis Procedure i.Bank check FUSES Cheque that the post-obit fuses are non blown. Are the fuses OK? Aye >> GO TO 2 NO >> If fuse is diddled, be certain to eliminate cause of malfunction before installing new fuse. 2.POWER SUPPLY Circuit CHECK 1. Turn ignition switch OFF. two. ...
Source: https://www.nialtima.com/removal_and_installation-1162.html
Posted by: helgesonafror1942.blogspot.com
0 Response to "How To Change Rear Shocks On 2012 Nissan Altima"
Post a Comment